Instructions
Instructions to deliver data to the SDC:
-
Request a user account. If this is the first time that you deliver data to the SDC, you need to contact us through the email producers@sdc.upm.es in order to get your credentials (user name and password). Generally, one account per data producer will be created, so it is recommended to use a generic email (not a personal one) in the registration process.
-
Prepare your data for delivery, according to the following folder structure:
- <investigation-name>
- /documentation
- /ancillary
- /example
- /data
- /metadata
- /pre-flight
- /data
- /metadata
- /flight
- /data
- /metadata
- /postflight
- /data
- /metadata
Please, bear in mind that:
- This folder structure will be already created on the SDC data delivery area.
- In the case of a muti-experiment investigation, there will be subfolders <experiment-name> under the investigation folder.
- The ‘metadata’ folder shall have the same directory hierarchy as the ‘data’ folder.
- Organize the files per data products (i.e. create a subfolder per data product listed in the Investigation Data Blank Book) whenever possible.
- Ancillary data (i.e. non-scientifically relevant data) should be transferred to the ancillary folder accompanied with the list of checksums for each file.
- Sensitive data files must be organized by data subject, bundled in a zip file and encrypted using the SDC PGP public key*. There are many PGP encryption solutions: e.g. Gpg4win for Windows and GnuPG for GNU/Linux/BSD. If you need support on how to encrypt files using PGP, please do not hesitate to contact us.
- To optimize the data transfer, the content of the dataset folders (example, pre-flight, flight, postflight) can be compressed in zip files. Remember that it is necessary to transfer the list of checksums for each zip file (in the same way as for the ancillary data files)
- <investigation-name>
-
Data transfer. We offer several ways to transfer your data. Log in and detailed instructions can be found at the bottom of the page.
- SFTP access (Recommended): Secure and efficient large-scale data transfer.
- Web interface (Nextcloud): An alternative for users unable to use SFTP (e.g., due to firewall restrictions) or experiencing poor SFTP performance. Not recommended for large bulk data transfers.
- WebDAV: A viable option for users facing firewall restrictions or SFTP performance issues. Unlike the Nextcloud, it has no issues on large data transfers.
- Physical disk shipment: Available only in exceptional cases where electronic transfer is impractical (e.g. extremely large datasets or other technical constraints) . Prior agreement with the SDC team is required. Before sending the disk, you must provide an fsck log to verify file system integrity and a S.M.A.R.T. log to check the disk’s health status. Please contact the SDC team in advance for further details.
- Data delivery notification. For every delivered dataset (e.g. example, preflight, flight, postflight), you must send an email to the SDC investigation coordinator(s) or to science@sdc.upm.es once the data and metadata transfer has been completed. Please deliver the same amount of data (size and number of files) that is defined in the Investigation Data Blank Book (BB).
- Data verification report. SDC checks the received data and generates a report with the following information:
- Metadata files structure check
- Data files integrity check
- Metadata and data files availability (one metadata file shall be found per every data file and vice versa)
- Wrong metadata files (with wrong fields, that do not validate against the scheme)
- Antivirus and empty files
- Number of ingested files compared to files defined in the BB
- Analysis of file naming and content compared to the definition in BB (only for the example dataset)
The report will be delivered by email (by default, to the same address from which we received the data delivery notification). If the checks are successful, then the dataset delivery can be considered finished. Otherwise, we’ll request to resend the corrupt/missing data or metadata files.
Please, notice that sensitive data must be encrypted before uploading or shipping.
* Fingerprint: 122C5A0E21B64D46BBF25A63967B50390E058ACE.
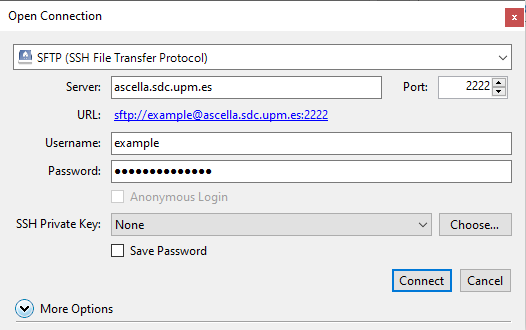
After receiving your credentials by email, you can upload files to the SDC data delivery area via SFTP (SSH File Transfer Protocol). From the many SFTP clients available, we recommend using Cyberduck for Windows systems and LFTP for Linux systems.
The configuration parameters for our SFTP server are:
- Host: sftp://ascella.sdc.upm.es
- Username:<your username>
- Password:<your password>
- Port: 2222
To connect using the Cyberduck client, click on the Open connection button. Once the Open connection dialogue appears, insert the configuration parameters as follows:

Click on the connect button. A notification window about the fingerprint will appear, before clicking on Allow you should check if the fingerprint matches 2d:96:c8:57:d3:08:ef:ed:c4:fb:aa:8c:06:78:eb:03. You should now be able to view the directories and files in your delivery area.
Open the following URL on your web browser: https://ascella.sdc.upm.es/ and follow the on-screen instructions to log in and upload files.
You can upload files by clicking on the icon marked with a + sign or by dragging and dropping them directly into the window.
Do not overstrain your web browser by trying to upload a very large number of files (more than a few thousands) at once; it could lead to a crash under the heavy load. If you have lots of files, try to transfer them in a few batches or perhaps in a ZIP file.
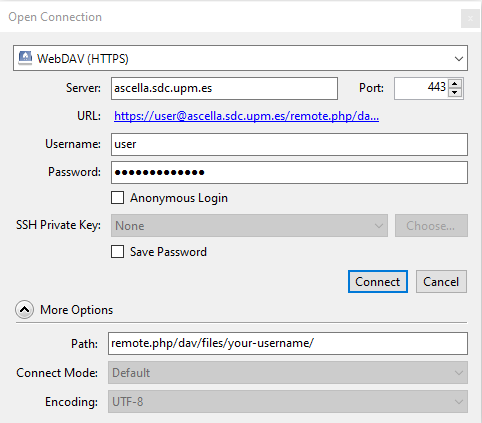
The Nextcloud service offers the possibility to transfer files using WebDAV protocol (instead of using the web browser). Follow the instructions below to configure a WebDAV client (we recommend using Cyberduck):
-
Open Cyberduck and click on the Open Connection button.
-
In the drop-down menu, select WebDAV (HTTPS) protocol.
-
In the Open Connection window, fill in the following fields:
- Server: ascella.sdc.upm.es
- Port: 443
- Username:<your username>
- Password:<your password>
-
Click on More Options and in the Path field, enter the path of your Nextcloud directory.
To find the path, log in to Nexcloud (see instructions above) and click on Files Settings in the bottom left corner. The path should appear – copy it starting from the “remote” part (e.g “remote.php/dav/files/your-username/”).
Should look like this:
-
Click on Connect.
If everything works, you should be able to see the directories of your investigations.
